

Welcome to the first week of the Stitch Magic Stitch-Along! This week's theme is quilting, which begins on page 70 of the book Stitch Magic by Alison Reid. The book shows you several examples of hand and machine quilting and incorporates them into inspiring projects like a beautiful chair cushion and adorable egg cozies.
Here, I've taken the author's methods and practiced some of them exactly as written (like diamond quilting and tuft quilting with scraps), and also devised a few of my own exercises, like channel stitching and zigzag quilting, two techniques often used in clothing. If you’re a garment sewer like me, it’s tempting to write quilting off and never learn to do it! But quilted effects are not only great for home décor, they’re a staple of modern designer garments and vintage pieces alike. (See my quilted garment inspiration post for lots of ideas on how to incorporate quilting into fashion sewing.)
Now, on to the techniques! First you’ll need to prep your fabric squares. (If you'd like to read up on the prep process, Stitch Magic goes into a lot of detail on pages 74-75). Start by cutting eight 10” squares of muslin or other cotton fabric. Pink the edges so they don’t fray.
Now cut four 10” squares of your thin cotton batting. Sandwich the batting squares between two pieces of your cotton fabric and pin to secure. Now we’re going to hand baste the layers together so they don’t shift when we quilt them. Thread a needle with a single strand of all-purpose sewing thread. Start by making big diagonal running stitches from one upper corner to a lower corner. Repeat these lines of stitches in regular intervals. Now, do the same thing in the other direction. I used a different color thread so you can see my second direction of basting. As you can see, neatness doesn’t really count here! These are temporary stitches.

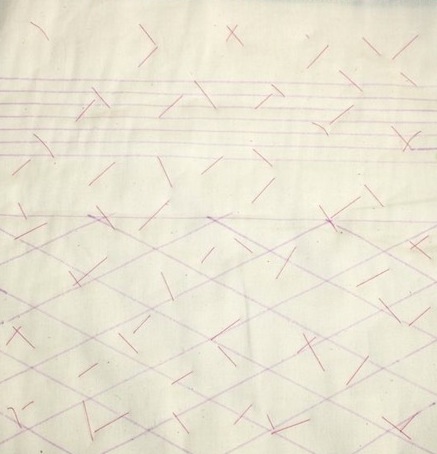
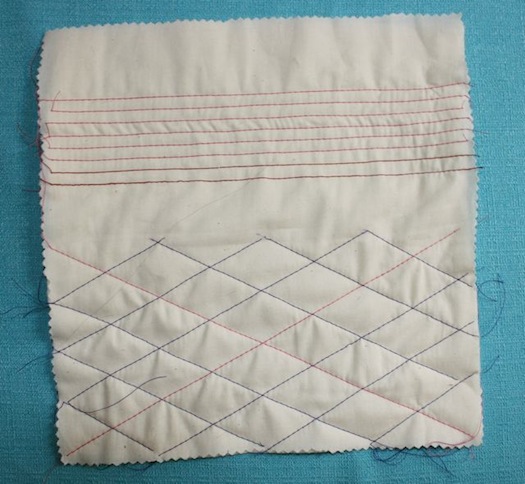
Now we’re ready to quilt! We’re going to start with some simple channel-stitching and diagonal quilting by hand. Prepare your square by marking it with a disappearing ink pen or some other removeable chalk. On the upper half of the square, draw about 7 parallel lines ¼” away from each other. On the bottom half of the square, make a 1” grid of diagonal lines.
Now we’re ready to try some channel stitching. This just means simple rows of stitching ¼” away from each other. (I’ve been in love with channel stitching ever since I saw it on a beautiful Diane Von Furstenberg dress a couple years ago. It was a glorious bright red wool jersey with a full circle skirt and a wide midriff band with channel stitching.) Load a large-eye needle with some embroidery thread and make a running straight stitch across your lines. Here's what the running stitch looks like in process.
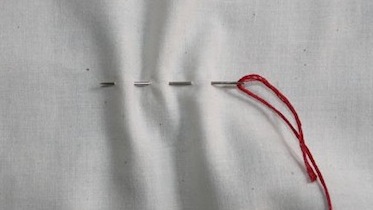
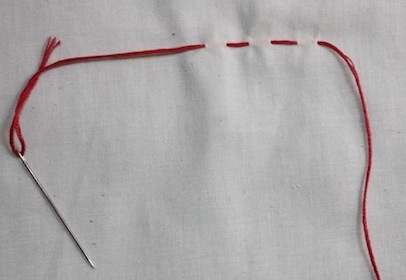
Now make the running stitch along your marked lines. Try to make your stitches as even as possible. Experiment with different effects by using fewer strands of embroidery floss. I started with 6 and then split the thread down to 3, 2, and 1 strands as I went up my lines. It gave a cool pseudo-ombre effect.

You can mark the back of your sample with the thread used (or any other notes) to remind yourself! 
Now for the diagonal quilting. Again, we’re just using a simple running stitch, but this time we’re quilting along our diagonal lines. I used 6 strands of embroidery floss for all of my lines here, but played around with two different colors to achieve an argyle effect. 
Isn’t your sample pretty?

Next, you can try the exact same exercise with machine quilting. I used regular all-purpose thread in my machine and used a 3.5mm straight stitch and a straight stitch presser foot. Make sure that you smooth out the square as you quilt to avoid puckers.
Now you can play around with different patterns if you like. I was eager to try some zigzag quilting. I drew one big zigzag on the upper half of a new square. Then I quilted the line by machine (you can do it by hand if you prefer). Next, I used the edge of my presser foot to make ¼” lines that echoed the first zigzag.

I found it a little difficult to get perfect lines using my presser foot edge, so next I did a ½” zigzag pattern, making each line with disappearing ink before quilting.
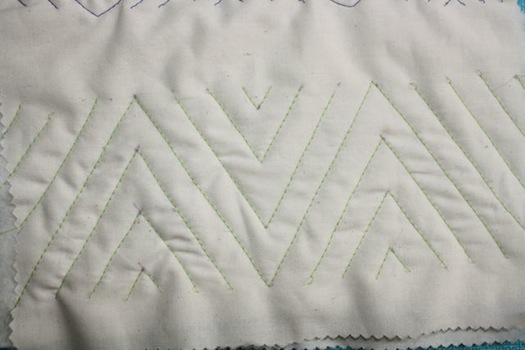
This is my favorite sample I think! I would love to make an entire circle skirt quilted in this pattern.
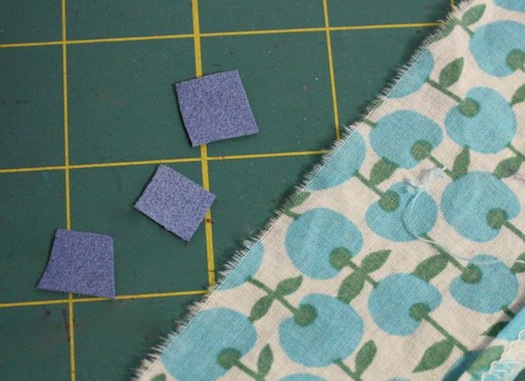
Last, you can try a fun effect that incorporates tiny fabric scraps and tufts made by tying off embroidery thread. Start by cutting small squares of two different fabrics, one a bit bigger than the other. I did my tiny squares in blue ultrasuede and my slightly bigger squares in a cotton print.
Layer the squares on top of each other and arrange them on your fabric square. Load a needle with embroidery thread and stitch down and back up through each square. Tie the embroidery thread in a knot and cut it off at about ¼” for cute little tufts.
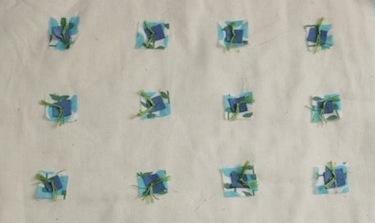
This would be really cute on a pillow, don't you think?
That’s it for this week, stitch-alongers. Next week we’ll be doing pintucks, which we’ll also do both by hand and machine. I’ll also discuss the pintuck presser foot and twin needles.
Happy stitching!